
Glue42 Platform Features
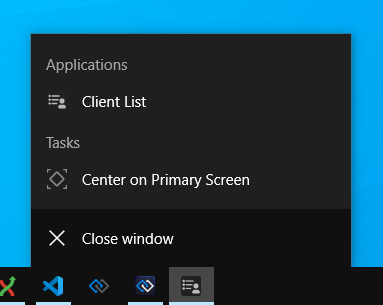
Service Windows
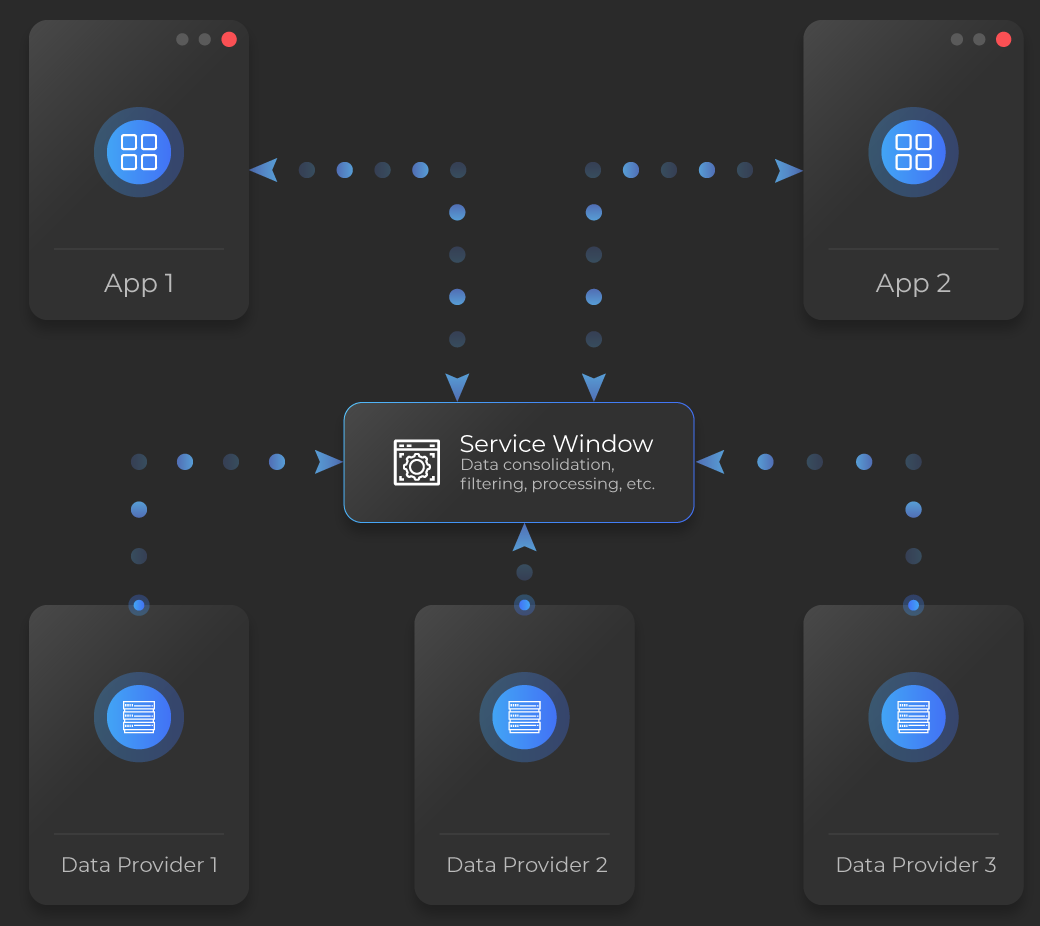
Service windows are hidden windows which perform a specific supporting role for your apps. They can be configured as any normal window (name, URL, etc.), the difference being that UI configuration isn't necessary, as it is assumed that the purpose of these windows is to provide some background service to your apps. Therefore, the user doesn't need to see them or interact with them.
Service windows may be useful in many scenarios. For instance, you may have a number of apps that will receive and process data from several different providers. Instead of setting up each app to receive and then process the data from every provider, you can create a hidden service window which will communicate with the providers, collect the data, pre-process it and route it to the respective apps. This way, your apps will handle communication with only one end point, all the necessary data is consolidated, processed and filtered at one central data hub from where it can be sent to any window. Depending on your needs and goals, you can configure your service windows to auto start on system startup, or to start when an app requests that service. The service windows approach offers you additional flexibility and versatility in designing solutions for the app services you need.
There are different ways to configure a service window, depending on whether you want the window to be automatically started when Glue42 Enterprise is initiated. Use a combination of the following app configuration properties to specify whether the window should be automatically started, invisible, or hidden from the Glue42 Toolbar:
| Property | Type | Description |
|---|---|---|
"service" |
boolean |
If true, both the "autoStart" top-level key and the "hidden" property of the "details" object will be overridden and set to true. The window will be invisible and will start automatically on Glue42 Enterprise startup. |
"hidden" |
boolean |
If true, the app won't be available in the Glue42 Toolbar. |
"autoStart" |
boolean |
If true, the window will be started automatically on Glue42 Enterprise startup. |
"details" |
object |
Use the "hidden" Boolean property of the "details" object to set the window visibility. If true, the window will be invisible. |
Note that when using the "service" property, it's pointless to use the "autoStart" top-level key and the "hidden" property of the "details" object, because the "service" key will override any values you may set for them.
The following example demonstrates how to use the "service" and "hidden" top-level keys to configure a service window that will start automatically, will be invisible and hidden from the Glue42 Toolbar:
{
    "name": "service-window",
    "type": "window",
    "service": true,
    "hidden": true,
    "details": {
        "url": "https://example.com/my-service-window",
    }
}
The following example demonstrates how to use the "hidden" and "autoStart" top-level keys and the "hidden" property of the "details" top-level key to configure a service window that will be hidden from the Glue42 Toolbar, won't start automatically and will be invisible:
{
    "name": "service-window",
    "type": "window",
    "hidden": true,
    "autoStart": false,
    "details": {
        "url": "https://example.com/my-service-window",
        "hidden": true
    }
}
Note that service windows aren't closed when restoring a Layout.
For more details, see the Developers > Configuration > Application section and the app configuration schema.
Citrix Apps
Available since Glue42 Enterprise 3.12
Glue42 Enterprise provides experimental support for Citrix Virtual Apps. Citrix apps can participate in the Glue42 environment as first-class citizens - they can be configured and added to the Glue42 Toolbar, saved in Layouts and Workspaces, and can use all Glue42 functionalities like Interop, Channels, etc.
Additionally, Glue42 Enterprise can be run as a Citrix Virtual App itself, in which case any other Virtual Apps from the same VDA can be configured as normal apps. See Dynamic Gateway Port for configuration specifics.
For more details on configuring a Citrix app, see the Developers > Configuration > Application section. For details on configuring the system-wide Citrix Virtual Apps support, see the System Configuration section.
Note that this feature is experimental – although it has been properly tested, additional tests and adjustments might be necessary for your specific Citrix environment.
Note that in order for Glue42 Enterprise to run Citrix Virtual Apps, Citrix Workspace must be installed on the user's machine and the user must be logged into it using their Citrix StoreFront URL and credentials. If you have access to a web-based StoreFront, you can configure your local Citrix Workspace by clicking on the "Activate" link in the settings or user preferences menu and running the downloaded file. The StoreFront SSL certificate must be trusted by the user's machine.
.NET Citrix Apps
To Glue42 enable a .NET Citrix app:
In your Visual Studio project, reference the
Glue42.dllavailable in the Glue42 NuGet package.Follow the standard procedure for Glue42 enabling .NET apps.
After initializing Glue42, you can check whether your app is connected to Glue42 in the following manner:
using Tick42.StartingContext;
if (InitializeOptions.IsCitrixGD)
{
    // Running in Citrix, connected to Glue42 Enterprise.
}
else if (InitializeOptions.IsCitrixVirtualApp)
{
    // Running in Citrix, not connected to Glue42 Enterprise.
}
When your Citrix app is connected to Glue42 Enterprise, you may want to remove any custom window decorations, since the top-level window chrome will be handled by Glue42 Enterprise.
- Add
%**to the app arguments in the Citrix Application Settings:
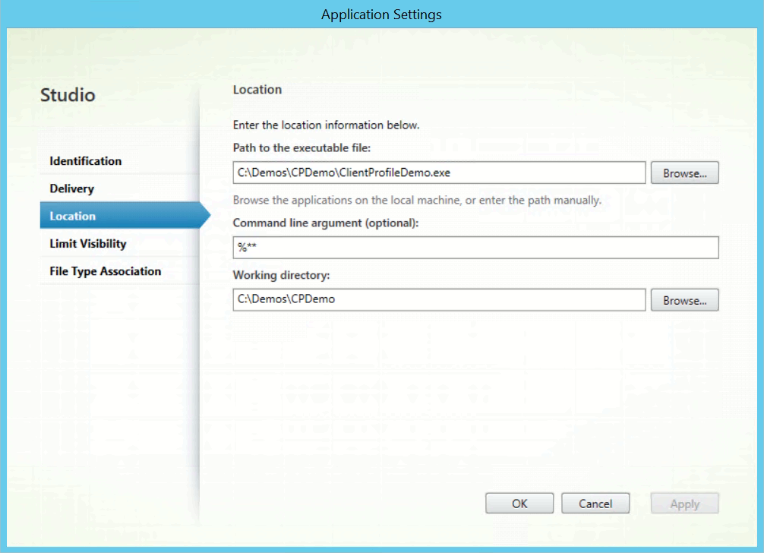
- Configure your app as a Glue42 Citrix app.
You will now be able to run your .NET Citrix app from Glue42 Enterprise and interoperate with it using the various Glue42 APIs.
Java Citrix Apps
To Glue42 enable a Java Citrix app:
Follow the standard procedure for Glue42 enabling Java apps.
In the Citrix Application Settings, set the path to a
javaw.exeorjava.exefile, use standard VM arguments to launch your Java app, and add%**at the end of the app arguments:
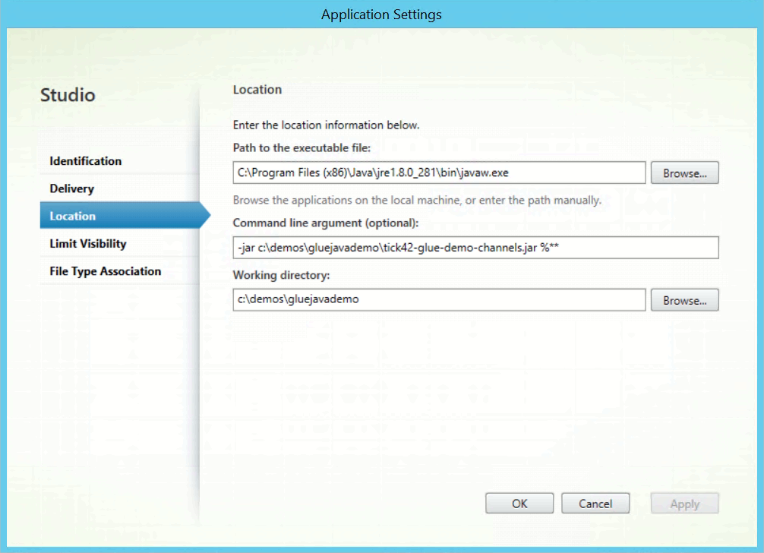
- Configure your app as a Glue42 Citrix app.
You will now be able to run your Java Citrix app from Glue42 Enterprise and interoperate with it using the various Glue42 APIs.
Preload Scripts
Available since Glue42 Enterprise 3.13
The app configuration file allows you to specify preload scripts for an app. The preload scripts will be executed before the actual web app is loaded and before each <iframe> on the page. Use the "preloadScripts" array of the "details" top-level key in the app configuration file to define the scripts and they will be executed in the specified order. This allows for easily injecting Glue42 functionality into third-party web apps over which you have little to no control.
The following example demonstrates defining two preload scripts by providing their respective URLs:
{
    "details": {
        "preloadScripts": [
            "https://my-domain.com/my-script.js",
            "https://my-domain.com/my-other-script.js"
        ]
    }
}
Available since Glue42 Enterprise 3.15
Preload scripts can be defined globally in the system configuration of Glue42 Enterprise. Use the "preloadScripts" property of the "windows" top-level key in the system.json file:
{
    "windows": {
        "preloadScripts": [
            "https://my-domain.com/my-script.js",
            "https://my-domain.com/my-other-script.js"
        ]
    }
}
Available since Glue42 Enterprise 3.23
The "preloadScripts" property can accept also an object with the following properties as a value:
| Property | Type | Description |
|---|---|---|
"scripts" |
string[] |
List of preload scripts (URLs) that will be loaded and executed before the actual page is executed. |
"useBase64PreloadScripts" |
boolean |
If true (default), will import the preload scripts as Base64 strings. |
The "useBase64PreloadScripts" property allows you to control how Glue42 Enterprise will import preload scripts. To improve this behavior, it's recommended to set the "useBase64PreloadScripts" property to false:
{
    "windows": {
        "preloadScripts": {
            "scripts": [
                "https://my-domain.com/my-script.js",
                "https://my-domain.com/my-other-script.js"
            ],
            "useBase64PreloadScripts": false
        }
    }
}
Global Protocol Handler
Available since Glue42 Enterprise 3.12
Glue42 Enterprise can be registered as a default global protocol handler. You can also register your own custom protocol handlers.
The Glue42 global protocol allows you to create and send links which will open a URL in a Glue42 Window. You can also create links that will start a Glue42 enabled app, load a specified Workspace or Layout and even invoke Interop methods with custom arguments.
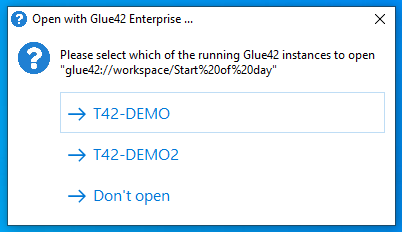
When the link is clicked, Glue42 Enterprise will be started in order to handle it. If an instance of Glue42 Enterprise is already running, it will be reused. If multiple instances are running (e.g., in different environments), then the user will be presented with a dialog from which to choose the Glue42 instance that will handle the link:
Configuration
The Glue42 global protocol can be configured from the system.json file of Glue42 Enterprise using the "protocolHandler" top-level key:
{
    "protocolHandler": {
        "enabled": true,
        "allowOpeningURLs": {
            "allowed": ["https://glue42.com"],
            "forbidden": ["https://youtube.com/.*", "https://facebook.com/.*"]
        }
    }
}
Note that since Glue42 Enterprise 3.19, the "protocolHandler" key accepts either a single object, or an array of objects. Passing an array of objects allows you to define more than one custom protocol handlers.
The "protocolHandler" object has the following properties:
| Property | Type | Description |
|---|---|---|
"enabled" |
boolean |
If true (default), will enable registering the default Glue42 protocol handler, as well as any other custom protocol handlers. |
"protocol" |
string |
Custom name for the protocol prefix. Defaults to "glue42". |
"register" |
string |
If true (default), Glue42 Enterprise will register the global protocol handler in the system registry. Set to false if you want to register the protocol some other way. Available since Glue42 Enterprise 3.19. |
"type" |
"glue42" | "custom" |
Type of the global protocol handler. If "custom", then the Interop method defined in "customHandler" will be invoked to handle the protocol command. Otherwise, it will be handled by the default Glue42 protocol handler. Available since Glue42 Enterprise 3.19. |
"customHandler" |
string |
Interop method that will be used as a custom global protocol handler. Defaults to "T42.GD.ProtocolHandler.Handle". Available since Glue42 Enterprise 3.19. |
"startNewInstance" |
object |
If enabled, will start a new Glue42 instance whenever a command for the default Glue42 or any custom global protocol handler is received. |
"allowOpeningURLs" |
boolean | object |
If true, will allow handling all URLs. Can also be set to an object containing a list of allowed or forbidden URLs for the Glue42 global protocol handler. Note that this setting won't be applied to any custom protocol handlers. If you want to use this setting in your custom protocol implementation, you can access its value via the object passed as an argument to your custom protocol handler. |
The "startNewInstance" object has the following properties:
| Property | Type | Description |
|---|---|---|
"enabled" |
boolean |
If true (default), will allow starting a new instance of Glue42 when opening links with the Glue42 protocol handler. |
"defaultExecutable" |
object |
An object with two properties - "path" and "args". The "path" property accepts a string path to an executable file that will be started if no other Glue42 instance is running. Defaults to the Glue42 executable file. The "args" property accepts a string array with items, each item representing a command line argument. Defaults to an empty array. Note that if you point the "path" property to a script file that in turn will launch Glue42 Enterprise, then you must pass the startup arguments from the script to Glue42 Enterprise. |
"errorMessage" |
string |
Message that will override the default error message displayed when starting a new Glue42 instance is disabled. |
The "allowOpeningURLs" property can be set to an object with the following properties:
| Property | Type | Description |
|---|---|---|
"allowed" |
string[] |
List of allowed URLs. All other URLs will be forbidden. |
"forbidden" |
string[] |
List of forbidden URLs. All other URLs will be allowed. |
You can use exact URL values or regular expressions to specify allowed and forbidden URLs.
Glue42 Protocol Options
The Glue42 global protocol can be used in different formats depending on what you want to do. The default Glue42 protocol is in the following format:
glue42://<option>/<identifier>[?args&args]To pass arguments when employing the different options of the Glue42 global protocol, use a single ? after the identifier, except with url - use double ?? when passing arguments for the url protocol option. Use & between the arguments when specifying more than one argument.
Apps
To start a Glue42 enabled app, use the app protocol option and pass the app name:
glue42://app/clientlistTo pass startup options for a Glue42 enabled app, use ? after the app identifier and & before each settings. The following example demonstrates passing a location and context for the started app:
glue42://app/clientlist?left=100&context.clientID=1To specify a property of an object as an option, use the standard dot notation - e.g., context.clientID=42.
Layouts
To restore a Global Layout, use the layout protocol option and pass the name of the Layout:
glue42://layout/StartOfDayWorkspaces
To open a Workspace, use the workspace protocol option and pass the Workspace name:
glue42://workspace/StartOfDayTo pass context for the Workspace, use context:
glue42://workspace/StartOfDay?context.clientID=1To specify a property of an object as an option, use the standard dot notation - e.g., context.clientID=42.
Glue42 Windows
To open a URL in a Glue42 Window, use the url protocol option and pass the URL:
glue42://url/https://google.com To specify Glue42 Window settings when opening a URL, use ?? after the URL and & before each setting. The following example demonstrates passing a location for the newly opened window:
glue42://url/https://google.com??left=100&top=200To specify a property of an object as a setting, use the standard dot notation - e.g., downloadSettings.autoSave=false.
Interop Methods
To invoke an Interop method, use the invoke protocol option and pass the method name:
glue42://invoke/ShutdownTo pass arguments and/or target when invoking an Interop method, use args and target:
glue42://invoke/ShowClient?args.clientId=1&target=bestCustom Protocol Handlers
Available since Glue42 Enterprise 3.19
Besides the default Glue42 global protocol handler, you can define your own custom protocol handlers. You must specify the name of the protocol prefix and the name of the Interop method that will be used as a protocol handler. The specified Interop method will be invoked each time a command for your custom protocol is received. The Interop method that will handle your custom protocol may be registered by an auto started hidden service app or any other way you deem fit.
Configuration
The following example demonstrates defining two custom protocol handlers, one of which will be added to the system registry by Glue42 Enterprise and the other won't:
{
    "protocolHandler": [
        {
            "enabled": true,
            "protocol": "my-custom-protocol",
            "type": "custom",
            "customHandler": "My.Custom.Protocol.Handler"
        },
        {
            "enabled": true,
            // This protocol won't be registered by Glue42 Enterprise.
            // You have to add it to the system registry some other way.
            "register": false,
            "protocol": "my-other-custom-protocol",
            "type": "custom",
            "customHandler": "My.Other.Custom.Protocol.Handler"
        }
    ]
}
For more details on the configuration options, see the Global Protocol Handler > Configuration section.
Implementation
When Glue42 Enterprise receives a protocol command, each available protocol handler will be invoked consecutively until the command has been handled or there are no more handlers. The handlers are invoked one after another and each one is awaited to finish processing the command before the next one is invoked.
If your protocol handler implementation returns a result or an object with a handled property set to true, the command will be considered handled and no more handlers will be invoked. If your implementation doesn't return anything or returns an object with a handled property set to false, then the next available protocol handler will be invoked.
The following example demonstrates a basic implementation of a protocol handler:
// Name of the protocol handler as defined in the configuration.
const name = "My.Custom.Protocol.Handler";
// Protocol handler implementation.
const handler = (data) => {
    console.log(data);

    // If nothing or `{ handled: false }` is returned,
    // the next available protocol handler will be invoked.
    return { handled: true };
};

await glue.interop.register(name, handler);
The object received as an argument by the protocol handler has the following properties:
| Property | Type | Description |
|---|---|---|
command |
string |
The executed protocol command. |
config |
object |
The protocol handler configuration object as defined in the system configuration of Glue42 Enterprise. This information may be useful if, for instance, you want to extract the protocol name or implement custom logic for handling the "allowOpeningURLs" property. |
Remote Archived Apps
Available since Glue42 Enterprise 3.20
Glue42 Enterprise can download, unarchive and run archived web or native apps hosted at a remote location. To specify the location of your archived app and headers for the request, use the "assets" top-level key in the app configuration file.
The "assets" object has the following properties:
| Property | Type | Description |
|---|---|---|
"src" |
string |
URL pointing to the location of the archived app that will be downloaded and extracted. |
"headers" |
object[] |
Array of objects, each with required "name" and "value" properties, defining the headers that will be added to the request for downloading the archived app. |
"noCache" |
boolean |
If true, the Cache-Control: no-cache header will be added. |
The following example demonstrates how to define the location of a remote archived web app, specify headers for the request, include the Cache-Control: no-cache header, and define the app entry point:
{
    "name": "my-archived-web-app",
    "type": "window",
    "asset": {
        "src": "https://example.com/my-archived-web-app.zip",
        "headers": [
            {
                "name": "header-name",
                "value": "header-value"
            }
        ],
        "noCache": true
    },
    "details": {
        "url": "$ASSET_LOCATION$/home.html"
    }
}
Note that if you don't specify an entry point for your web app in the "url" property, Glue42 Enterprise will try to access it via an index.html file.
The following example demonstrates how to define the location of a remote archived native app:
{
    "name": "my-archived-native-app",
    "type": "exe",
    "asset": {
        "src": "http://example.com/my-archived-native-app.zip"
    },
    "details": {
        "command": "MyArchivedNativeApp.exe",
        "path": "$ASSET_LOCATION$"
    }
}
The default location for downloading remote apps is %LocalAppData%/Tick42/UserData/%GLUE-ENV%-%GLUE-REGION%/remoteApps/<app-name> where <app-name> is the name of the app as defined in its configuration. You can use the $ASSET_LOCATION$ macro pointing to the default location of the extracted app when defining the "path" or the "url" property of your app, depending on its type.
For details on specifying locations for the system folders of Glue42 Enterprise, see the Developers > Configuration > System section.
Client Certificates
The users in an organization may be required to use various certificates for authentication when accessing different URLs. When a certificate is required, Glue42 Enterprise opens a dialog that shows the available certificates for the user to choose:

Available since Glue42 Enterprise 3.18
Users can check the "Always use the selected certificate if possible" checkbox to instruct Glue42 Enterprise to attempt to use the selected certificate for any further requests. In case the selected certificate can't be applied to a future request, the dialog will open again. You can configure the visibility of this checkbox and whether it should be checked by default. Use the "clientCertificates" property of the "windows" top-level key in the system.json system configuration file of Glue42 Enterprise:
{
    "windows": {
        "clientCertificates": {
            "alwaysUseCheckbox": {
                "enabled": true,
                "checked": true
            }
        }
    }
}
Users can reset the default certificates through the "Advanced" menu item in the tray menu of Glue42 Enterprise:
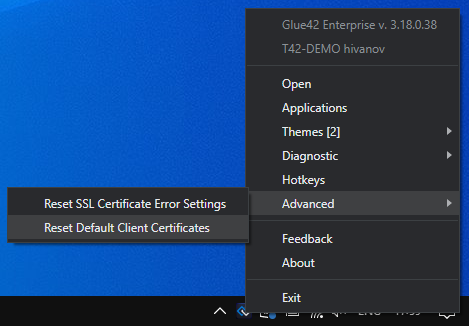
If the "Reset Default Client Certificates" menu item is greyed out, this means that no certificates have been set as default yet.
The following specifics for resetting certificates should be taken into account:
- Upon restart of Glue42 Enterprise, the selected default certificates are automatically reset.
- When the user resets the default certificates from the tray menu:
- If a certificate has already been used successfully for a request, Chromium will keep using it despite the certificate having been reset in Glue42 Enterprise and the dialog for selecting a certificate won't open for subsequent requests for the same resource. Only a restart of Glue42 Enterprise will truly reset the certificate and trigger the prompt page.
- If a certificate has been rejected by the server when attempting a request for a resource, resetting the default certificates from the tray menu will result in the dialog for selecting a certificate appearing again when the user makes a request for that same resource.
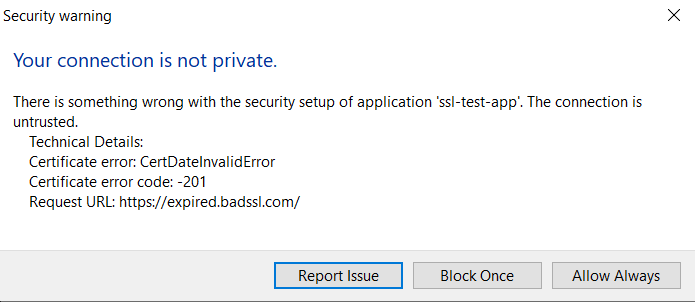
When for some reason a certificate doesn't pass the internal Chromium validation before being sent to the server, a dialog appears that offers options to the user to block or allow this certificate. The allowed certificates are then remembered for future use:
The "Reset SSL Certificates Error Settings" option of the "Advanced" menu item of tray menu can be used to reset the already remembered allowed certificates, which will result in the dialog appearing again when a previously allowed invalid certificate is used.
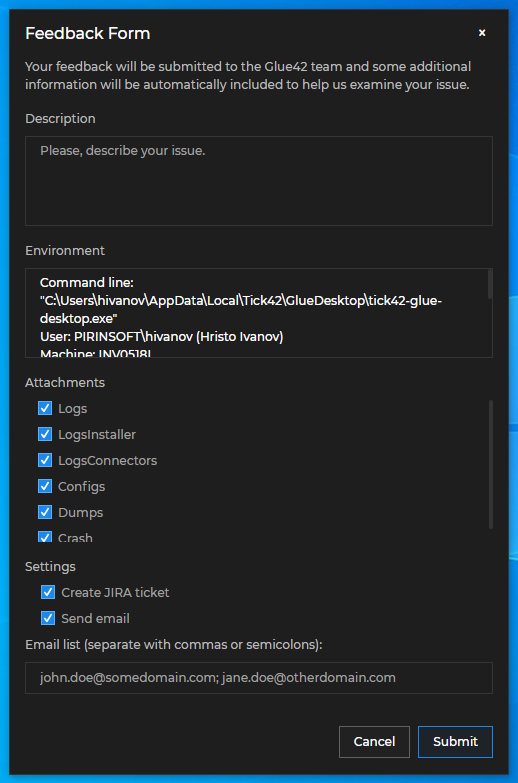
Issue Reporting
Glue42 Enterprise has a built-in Feedback Form that allows users to send feedback with improvement suggestions or bug reports. To report a problem or submit a suggestion, describe it in the "Description" field and optionally attach logs and configs to the report. The form can be configured to send an email with the report to the Glue42 team and/or to automatically create a Jira ticket with the issue reported by the user. Both on-premise and cloud-based Jira solutions are supported. The Feedback Form is a web app and can be completely customized.
Feedback Button
Available since Glue42 Enterprise 3.17
The Feedback Form can be opened directly from an app instance by using the "Feedback" button in the app window header. The "Feedback" button is disabled by default and can be enabled globally from the system configuration of Glue42 Enterprise or per app from the app configuration file. The app configuration will override the global system configuration.
Enable the "Feedback" button globally for all apps from the system.json configuration file using the "windows" top-level key:
{
    "windows": {
        "showFeedbackButton": true
    }
}
Disable the "Feedback" button for an app from its configuration:
{
    "details": {
        "showFeedbackButton": false
    }
}
Use the "supportEmails" top-level key of the app configuration to specify the emails of the app owners. The email addresses defined in this property will be added to the Feedback Form if it has been triggered from that app:
{
    "supportEmails": ["app.owner1@example.com", "app.owner2@example.com"]
}
Configuration
To configure the Feedback Form, use the "issueReporting" top-level key of the system.json file of Glue42 Enterprise located in %LocalAppData%\Tick42\GlueDesktop\config. The following is an example Feedback Form configuration:
{
    "issueReporting": {
        "attachmentsViewMode": "category",
        "jira": {
            "enabled": true,
            "url": "https://jira.tick42.com/rpc/soap/jirasoapservice-v2",
            "user": "user",
            "password": "password",
            "project": "MY_PROJECT"
        },
        "mail": {
            "enabled": true,
            "zipAttachments": true,
            "bugSubjectPrefix": "Error:",
            "reportSubjectPrefix": "Feedback:",
            "recipients": ["support@example.com", "dev-support@example.com"],
            "allowEditRecipients": true,
            "maxAttachmentMB": "10"
        },
        "folderAttachments": [
            {
                "name": "G4E-Screenshots",
                "folderPath": "%GLUE-USER-DATA%/logs",
                "zipFolderPath": "GlueDesktop\\Screenshots",
                "filter": "*.png",
                "category": "Screenshots",
                "selected": false,
                "recursive": true
            },
            {
                "name": "G4E-AppLogs",
                "folderPath": "%GLUE-USER-DATA%/logs",
                "zipFolderPath": "GlueDesktop\\Logs",
                "filter": "*.log*",
                "category": "Logs",
                "selected": true,
                "recursive": true
            },
            {
                "name": "G4E-Crashes",
                "folderPath": "%GLUE-USER-DATA%/crashes/reports",
                "zipFolderPath": "GlueDesktop\\Crashes",
                "filter": "*.dmp",
                "category": "Dumps",
                "recursive": false
            }
        ],
        "form": {
            "width": 350,
            "height": 500
        }
    }
}
The "issueReporting" top-level key has the following properties:
| Property | Type | Description |
|---|---|---|
"jira" |
object |
Required. Jira configuration. For more details, see the Jira section. |
"mail" |
object |
Required. Mail configuration. For more details, see the Mail section. |
"folderAttachments" |
object[] |
Required. Attachments configuration. For more details, see the Attachments section. |
"attachScreenShots" |
boolean |
If true, will attach screenshots of all monitors to the issue report. |
"attachmentsViewMode" |
"file" | "category" |
Defines how the attachments will be displayed in the Feedback Form. Possible values are "file" or "category". If set to "file", all attachable files will be displayed as separate items, otherwise several main categories will be displayed and if the category is selected by the user, all files in it will be attached. |
"form" |
object |
Object that can be used to specify various properties for the Glue42 Window containing the Feedback Form, or to provide a URL pointing to a custom Feedback App. |
Jira
The configuration for automatically creating a Jira ticket when submitting a Feedback Form is found under the required "jira" property of the "issueReporting" top-level key. It accepts an object with the following properties:
| Property | Type | Description |
|---|---|---|
"enabled" |
boolean |
If true, will enable the option to create a Jira ticket when submitting the issue. |
"url" |
string |
Required. Link to the Jira API. |
"user" |
string |
Required. The username of the user that will create the ticket. |
"password" |
string |
Required. The password of the user that will create the ticket. |
"project" |
string |
Required. The name of the project in which the ticket will be created. |
"preferredRole" |
string |
Preferred role in the Jira project. |
"preferredRoleDescriptor" |
string |
Description of the preferred role in the Jira project. |
"useProjectLeadAsPreferredAssignee" |
boolean |
Whether to assign the ticket to the project lead. |
"tlsVersion" |
string |
Force TLS protocol version, e.g. "TLS1.2". |
"noPriority" |
boolean |
If true, the ticket "Priority" field won't be set. |
"noEnvironment" |
boolean |
If true, the ticket "Environment" field won't be set. |
The configuration for automatically sending an email when submitting a Feedback Form is found under the required "mail" property of the "issueReporting" top-level key. It accepts an object with the following properties:
| Property | Type | Description |
|---|---|---|
"enabled" |
boolean |
If true, will enable the option to send an email when submitting the issue. |
"zipAttachments" |
boolean |
If true, the attachments will be archived. |
"bugSubjectPrefix" |
string |
Prefix for the email subject when the issue is a bug. |
"reportSubjectPrefix" |
string |
Prefix for the email subject when sending feedback. |
"recipients" |
string[] |
A list of email addresses to which the issue report will be sent. |
"allowEditRecipients" |
boolean |
If true, the user will be allowed to manually add more recipients. |
"maxAttachmentMB" |
string |
The maximum size of the attachments in MB. |
Attachments
The configuration for attaching files when submitting a Feedback Form is found under the required "folderAttachments" property of the "issueReporting" top-level key. It accepts an array of objects, each with the following properties:
| Property | Type | Description |
|---|---|---|
"name" |
string |
Required. Name for the attachment. |
"folderPath" |
string |
Required. Path to the folder that will be attached. |
"zipFolderPath" |
string |
Required. Path in the archived folder. |
"filter" |
string |
Required. Regex filter that will be applied to each file in the folder - e.g., "*.log". |
"category" |
string |
Required. Category for the attached item. |
"selected" |
boolean |
If true, the category (or all files under this category) in the Feedback Form will be selected by default. |
"recursive" |
boolean |
If true, will collect and attach all files from all folders located inside the specified folder. Set to false to collect the files only in the specified folder. |
Form
To configure the Glue42 Window containing the Feedback Form, use the "form" property of the "issueReporting" top-level key. It accepts an object with the following properties:
| Property | Type | Description |
|---|---|---|
"url" |
string |
URL pointing to the location of the Feedback App. Defaults to "file://%GDDIR%/assets/issue-reporting/index.html". |
"width" |
number |
Width in pixels for the Feedback Form. |
"height" |
number |
Height in pixels for the Feedback Form. |
"showEnvironmentInfo" |
boolean |
If true, the Feedback Form will show a field with details about the Glue42 environment. |
"transparent" |
boolean |
If true, the Glue42 Window containing the Feedback Form will have a transparent background. Available since Glue42 Enterprise 3.24. |
Note that the "transparent" property will set a transparent background only for the Glue42 Window that contains the Feedback App. To achieve actual transparency, you must also set a transparent background for your app from its styles.
Extending the Feedback Form
Available since Glue42 Enterprise 3.18
The @glue42/feedback-ui-react library enables you to create your own Feedback App for Glue42 Enterprise. The library provides hooks and default components which you can use to build your own Feedback App by using, modifying or replacing the available components and functionalities.
To use the library in your project, execute the following command:
npm install @glue42/feedback-ui-reactNote that the @glue42/feedback-ui-react library doesn't include a built Feedback App. A Feedback App is provided in Glue42 Enterprise. You can also use and customize the Feedback App template.
Configuration
To use your custom Feedback App built with the @glue42/feedback-ui-react library, modify (or add) the "form" property to the "issueReporting" top-level key in the system.json file of Glue42 Enterprise located in %LocalAppData%\Tick42\GlueDesktop\config. Set the "url" property of the "form" object to the URL of your custom Feedback App:
{
    "issueReporting": {
        "form": {
            "url": "http://localhost:3000"
        }
    }
}
For more available customizations of the Feedback App through configuration, see the Issue Reporting > Configuration section.
Hooks
The useIssueReportingContext() hook provides context information about the Feedback App, as well as methods for the default Feedback functionalities which you can use directly in your custom components:
const {
    close,
    config,
    onThemeChanged,
    openUrl,
    setBounds,
    submit,
    submitCompleted,
} = useIssueReportingContext();| Property | Type | Description |
|---|---|---|
close() |
function |
Closes the Feedback App. |
config |
object |
Object describing the configuration for the Feedback Form. |
onThemeChanged() |
(callback: (theme: string) => void) => void |
Method that can be used to track theme changes. The callback parameter is invoked every time the theme changes and receives as an argument the name of the new theme. |
openUrl() |
(url: string) => void |
Opens a URL in the default browser. Can be used to open the URL of the newly created Jira ticket after the issue report has been submitted. |
setBounds() |
(left: number, top: number, width: number, height: number) => void |
Sets the bounds of the Feedback Form. |
submit() |
function |
Submits an issue report. |
submitCompleted |
boolean |
Boolean flag indicating whether the issue report submit process has been completed. |
The config object has the following properties:
| Property | Type | Description |
|---|---|---|
allowEditRecipients |
boolean |
Flag indicating whether the user is allowed to manually add or remove email recipients. |
applicationTitle |
string |
Title of the Feedback App. |
attachments |
object[] |
Array of objects each with id, name and category properties describing the available attachments. |
attachmentsViewMode |
"file" | "category" |
Describes how the attachments are displayed in the Feedback App. |
buildVersion |
string |
Platform build version as specified in the "build" top-level key of the system.json file of Glue42 Enterprise. |
createJiraTicket |
boolean |
Flag indicating whether a Jira ticket will be created when the issue report has been submitted. |
env |
string |
Platform environment as specified in the "env" top-level key of the system.json configuration file of Glue42 Enterprise. |
environmentInfo |
string |
Platform environment details. |
errorMessage |
string |
Error message sent by the platform. |
isError |
boolean |
Flag indicating whether the submitted feedback is about a platform error. |
mailingList |
string |
List of default email recipients. |
region |
string |
Platform region as specified in the "region" top-level key of the system.json configuration file of Glue42 Enterprise. |
selectedCategories |
string[] |
List of selected attachments or attachment categories. |
sendEmail |
boolean |
Flag indicating whether an email with the issue report will be sent to the specified recipients. |
showEnvironmentInfo |
boolean |
Flag indicating whether the Feedback App will show a field with environment details about the platform. |
theme |
string |
The name of the current theme. |
version |
string |
Platform version. |
Components
All default components can be reused and composed with custom code. If usage of such component has been detected, its default behavior will be applied. For instance, if you use the <SubmitButton /> component, it will automatically submit the issue report when the button is clicked, without the need of custom code to induce this behavior. If you pass the same component more than once, an error will be thrown.
To remove a component, pass a <Fragment /> component. If you want to use a default functionality (e.g., for closing the Feedback Form) in your custom components, use the useIssueReportingContext() hook to acquire it and pass it to your component.
In your custom Feedback App, you should place the <Feedback /> components in the <IssueReportingProvider /> component. This component is a React context provider component that provides feedback-related data and functionality accessible through the useIssueReportingContext() hook.
The following example demonstrates a basic usage of the library:
import React from "react";
import { IssueReportingProvider } from "@glue42/feedback-ui-react";
import CustomFeedback from "./CustomFeedback";

const App = () => {
    return (
        <IssueReportingProvider>
            <CustomFeedback />
        </IssueReportingProvider>
    );
};

export default App;
Feedback Component
The <Feedback /> component is used for rendering the Feedback Form. The following example demonstrates the structure of the <Feedback /> component, its properties and default values:
<Feedback
    components={{
        Header: () => {
            return (
                <div>
                    <Title />
                    <HeaderButtons />
                </div>
            );
        },
        HeaderButtons: () => {
            return (
                <div>
                    <ButtonGroup>
                        <CloseButton />
                    </ButtonGroup>
                </div>
            );
        },
        Body: () => {
            return (
                <div>
                    <form></form>
                </div>
            );
        },
        Footer: () => {
            return (
                <div>
                    <FooterButtons />
                </div>
            );
        },
        FooterButtons: ({ submitCompleted }) => {
            if (submitCompleted) {
                return (
                    <ButtonGroup >
                        <ButtonWithIcon />
                    </ButtonGroup>
                );
            } else {
                return (
                    <ButtonGroup>
                        <CancelButton />
                        <SubmitButton />
                    </ButtonGroup>
                );
            };
        },
        SubmitButton: SubmitButton,
        CancelButton: CancelButton,
        CloseButton: CloseButton,
        Button: Button,
        ButtonGroup: ButtonGroup,
        ButtonWithIcon: ButtonWithIcon,
        Alert: Alert,
        Block: Block,
        Checkbox: Checkbox,
        Input: Input,
        Label: Label,
        Progress: Progress,
        Radio: Radio,
        Select: Select,
        Textarea: Textarea,
        Title: Title
    }}
/>
Header Component
The <Header /> component holds the <Title /> and the <CloseButton /> button components. The following example demonstrates creating a header for the Feedback App with a custom title and an additional custom header button. The default <CloseButton /> component is used with its default functionality for closing the Feedback App:
import React from "react";
import {
    Title,
    CloseButton,
    ButtonGroup,
    useIssueReportingContext
} from "@glue42/feedback-ui-react";
import CustomButton from "./CustomButton";

// Custom header title.
const CustomTitle = () => {
    const { config } = useIssueReportingContext();
    const { applicationTitle } = config;
    const title = applicationTitle ? `My ${applicationTitle}` : "My Custom Feedback App";

    return <Title className="draggable" text={title} />;
};

// This component holds the header buttons.
const CustomHeaderButtons = () => {
    // Get the deafult funactionality for closing the Feedback App.
    const { close } = useIssueReportingContext();

    return (
        <ButtonGroup>
            <CustomButton />
            <CloseButton onClick={close} />
        </ButtonGroup>
    );
};

// Custom header for the Feedback App.
const CustomHeader = () => {
    return (
        <div>
            <CustomTitle />
            <CustomHeaderButtons />
        </div>
    );
};

export default CustomHeader;
To use the custom header for the Feedback App, pass it to the <Feedback /> component:
import React from "react";
import { Feedback, IssueReportingProvider } from "@glue42/feedback-ui-react";
import CustomHeader from "./CustomHeader";

const App = () => {
    return (
        <IssueReportingProvider>
            <Feedback
                components={{
                    Header: CustomHeader
                }}
            />
        </IssueReportingProvider>
    );
};

export default App;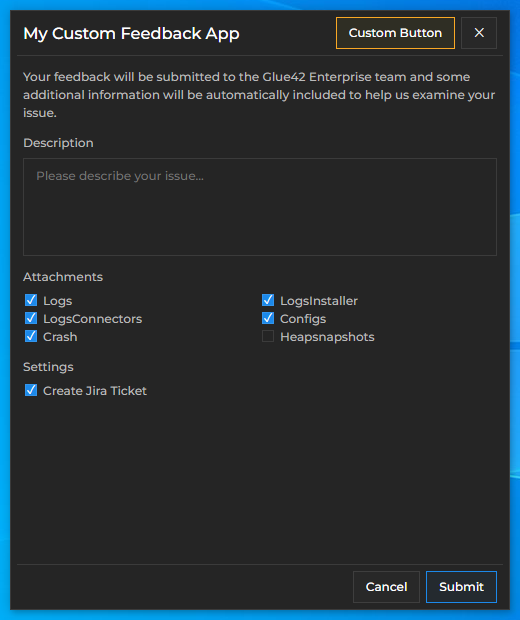
Body Component
You can use the <Body /> component to create a body for the Feedback App containing the desired issue reporting options - e.g., issue description field, attachments, Jira ticket and email options. The @glue42/feedback-ui-react library provides various components to choose from when constructing the view of your custom form: <TextArea />, <Checkbox />, <Block />, <Input />, <Select /> and more (see Feedback Component).
The following example demonstrates creating a body for the Feedback App containing custom text informing the user what will happen when they click the "Submit" button, a text area for describing the issue, and a "Settings" section containing only a single restricted option for creating a Jira ticket:
import React from "react";
import {
    Block,
    Textarea,
    Checkbox,
    useIssueReportingContext
} from "@glue42/feedback-ui-react";

// Custom body for the Feedback App.
const CustomBody = ({ handleSubmit, submitting }) => {
    const { config } = useIssueReportingContext();
    const { buildVersion, createJiraTicket } = config;
    const customText = `Your feedback will be submitted to the ${buildVersion} team`
        + (createJiraTicket ? " and a Jira ticket will be created." : ".")

    // The body contains the custom text, a text area for describing the issue, and a "Settings" section.
    return (
        <div>
            <form onSubmit={event => handleSubmit(event)}>
                <Block text={customText} />

                <Block text="Description">
                    <Textarea disabled={submitting} />
                </Block>

                {createJiraTicket &&
                <Block text="Settings">
                    <Checkbox
                        disabled={true}
                        defaultChecked={createJiraTicket}
                        label="Create Jira Ticket"
                    />
                </Block>}
            </form>
        </div>
    );
};

export default CustomBody;
To use the custom body for the Feedback App, pass it to the <Feedback /> component:
import React from "react";
import { Feedback, IssueReportingProvider } from "@glue42/feedback-ui-react";
import CustomHeader from "./CustomFooter";
import CustomBody from "./CustomFooter";

const App = () => {
    return (
        <IssueReportingProvider>
            <Feedback
                components={{
                    Header: CustomHeader,
                    Body: CustomBody
                }}
            />
        </IssueReportingProvider>
    );
};

export default App;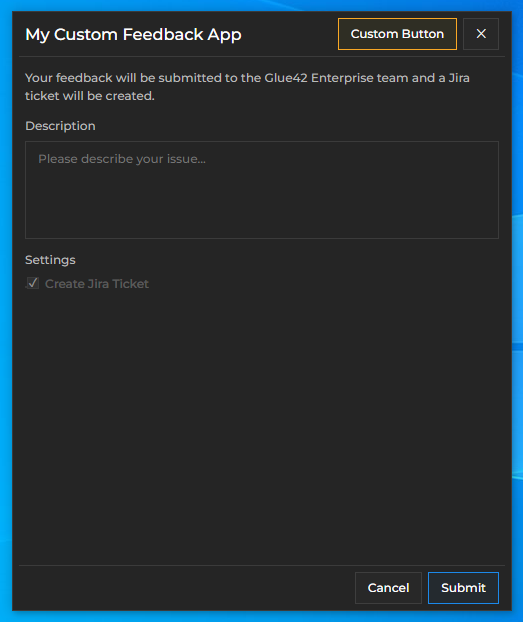
Footer Component
By default, the <Footer /> component holds the <FooterButtons /> component that renders conditionally either the <SubmitButton /> and the <CancelButton /> components, or a "Close" button based on whether submitting the issue report has been completed. During submission, the <Footer /> component renders the <Progress /> component showing the submission progress. When the submission is completed, the <Footer /> component renders an <Alert /> component showing the status of the submission, and if creating a Jira ticket has been enabled in the system configuration, a URL pointing to the created Jira ticket is also shown to the user.
The following example demonstrates adding a custom footer button:
import React from "react";
import {
    SubmitButton,
    CancelButton,
    ButtonGroup,
    useIssueReportingContext
} from "@glue42/feedback-ui-react";
import CallSupportButton from "./CallSupportButton";

// This component holds the footer buttons.
const CustomFooterButtons = () => {
    const { close } = useIssueReportingContext();

    return (
        <ButtonGroup>
            <SubmitButton form="feedback" type="submit" />
            <CallSupportButton />
            <CancelButton onClick={close} />
        </ButtonGroup>
    );
};

// Custom footer for the Feedback App.
const CustomFooter = () => {
    return (
        <div>
            <CustomFooterButtons />
        </div>
    );
};

export default CustomFooter;
To use the custom footer for the Feedback App, pass it to the <Feedback /> component:
import React from "react";
import { Feedback, IssueReportingProvider } from "@glue42/feedback-ui-react";
import CustomHeader from "./CustomFooter";
import CustomBody from "./CustomFooter";
import CustomFooter from "./CustomFooter";

const App = () => {
    return (
        <IssueReportingProvider>
            <Feedback
                components={{
                    Header: CustomHeader,
                    Body: CustomBody,
                    Footer: CustomFooter
                }}
            />
        </IssueReportingProvider>
    );
};

export default App;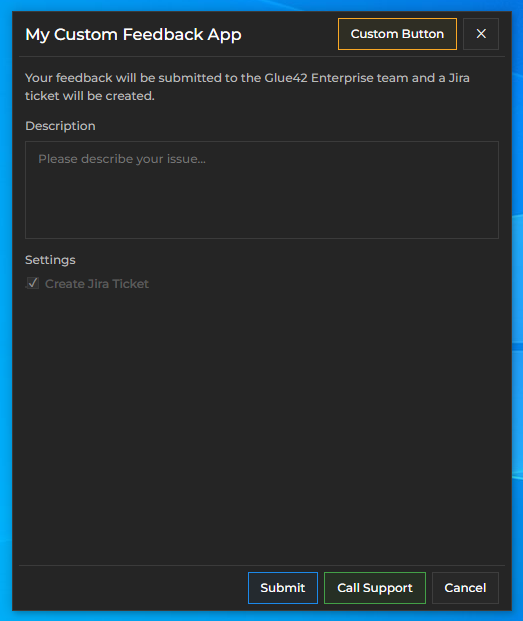
Open App
The Open app of Glue42 Enterprise is accessible from the tray menu. It's designed for users to be able to quickly and easily open Glue42 Windows from the UI by providing only a URL.
Available since Glue42 Enterprise 3.20
Advanced users can use the JSON editor in the "Advanced Options" section to provide any valid options for opening a window.
The following example demonstrates how to open a flat Glue42 Window, add the Channel Selector to it, and join the window to the "Red" Channel:
{
    "mode": "flat",
    "allowChannels": true,
    "channelId": "Red"
}
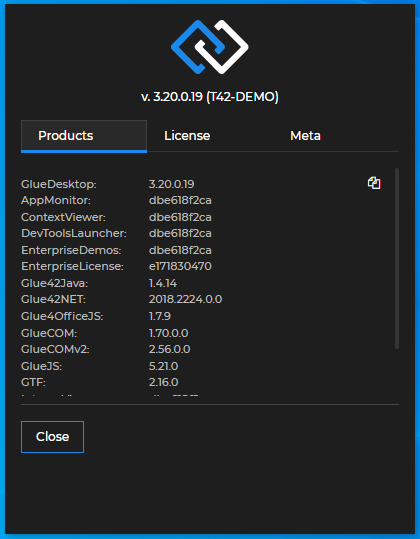
About App
The default About app of Glue42 Enterprise is accessible from the tray menu. It shows details about Glue42 Enterprise and its components, also license and any available meta information:
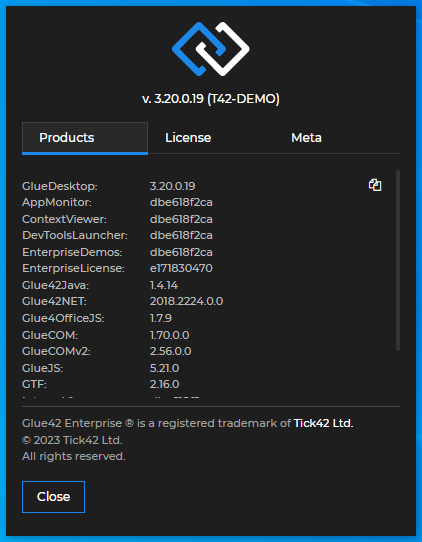
Available since Glue42 Enterprise 3.20
To customize the About app of Glue42 Enterprise, use the "about" top-level key of the system.json system configuration file.
The "about" object has the following properties:
| Property | Type | Description |
|---|---|---|
"url" |
string |
URL pointing to the location of the About app. |
"width" |
number |
Width in pixels for the About app. |
"height" |
number |
Height in pixels for the About app. |
"hideTrademark" |
boolean |
Hide the trademark information section in the About app. |
To remove the trademark information at the bottom of the page, use the "hideTrademark" property:
{
    "about": {
        "hideTrademark": true
    }
}
You can also change the entire content displayed in the About app and its size by providing a URL to be loaded instead of the default app and specifying the desired width and height.
The following example demonstrates how to modify the size and the content of the About app:
{
    "about": {
        "url": "https://glue42.com/",
        "width": 500,
        "height": 500
    }
}
Downloading Files
Glue42 Enterprise allows for files to be downloaded by clicking on a link in the web page or by invoking an Interop method.

Configuration
The file download behavior is controlled by the system configuration. It can be alternatively overridden by the app configuration. The system download behavior configuration can be set in the system.json file of Glue42 Enterprise from the "downloadSettings" property of the "windows" top-level key:
System configuration example:
{
    "windows": {
        "downloadSettings": {
            "autoSave": true,
            "autoOpenPath": false,
            "autoOpenDownload": false,
            "enable": true,
            "enableDownloadBar": true,
            "path": "%DownloadsFolder%"
        }
    }
}
The "downloadSettings" object has the following properties:
| Property | Type | Description |
|---|---|---|
"autoSave" |
boolean |
If true, will auto save the file (without asking the user where to save it). If false, a system save dialog will appear. |
"autoOpenPath" |
boolean |
If true, will open the folder that contains the downloaded file after the download is completed. |
"autoOpenDownload" |
boolean |
If true, will open the download file after the download is completed. |
"enable" |
boolean |
If true, enables the window to download files. |
"enableDownloadBar" |
boolean |
If true, a download bar tracking the progress will appear at the bottom of the window when downloading. If false, the download process will be invisible. |
"path" |
string |
Path where the downloaded file will be saved. Due to security reasons, it is only possible to provide two download paths: the Windows "Temp" or "Downloads" folder. |
You can also override the default system download behavior in the app configuration JSON file:
{
    "title": "Download Test Files",
    "type": "window",
    "name": "download-test-files",
    "details": {
        "url": "https://downloadtestfiles.com/",
        "top": 100,
        "left": 400,
        "width": 800,
        "height": 800,
        "allowCollapse": false,
        "startLocation": "center",
        "downloadSettings": {
            "autoSave": false
        }
    }
}
Clicking on a Link in the Web Page
When a user clicks on a download link in the website, the download will start and Glue42 Enterprise will show the download bar in the page.
The user has options to:
- cancel the download;
- pause and later resume the download;
- open the downloaded file in the containing folder;
Invoking an Interop Method
On startup, Glue42 Enterprise registers an Interop method "T42.Wnd.DownloadFile" which you can invoke with the following arguments in order to download files programmatically:
| Parameter | Type | Description |
|---|---|---|
url |
string |
Required. Download link. |
name |
string |
Optional. File name. |
path |
string |
Optional. Location for the file. |
autoOpenDownload |
boolean |
Optional. If true, will open the file after download. Defaults to false. |
autoOpenPath |
boolean |
Optional. If true, will open the location of the file. Defaults to false. |
When downloading the selected file, the cookies for that domain are taken and sent together with the request.
Note that if the file name already exists, the downloaded file will be saved with an incremented number in the name (e.g., my-docs(2).pdf).
Using the Window Management API
Download settings can also be specified using the Window Management API (for more details, see Downloads).
Opening URLs in the Default Browser
Available since Glue42 Enterprise 3.13
Glue42 Enterprise comes with a predefined app which can be used to open a URL in the default browser using the App Management API. The following example shows how to open a URL in the default browser by using the JavaScript App Management API.
Get the Application instance by passing the name of the app - "open-browser", invoke the start method to start the app and pass a starting context with a url property holding the URL:
const url = "https://glue42.com";

await glue.appManager.application("open-browser").start({ url });
Note that only URLs with HTTP or HTTPS protocols can be opened.
Web App Search
Available since Glue42 Enterprise 3.11
Search in web apps opened in Glue42 Windows just like in a browser with the CTRL + F command:

Use ENTER and SHIFT + ENTER to scroll through the results. Click ESC to close the search bar.
Context Menu
Glue42 Enterprise has a right-click context menu available in all Glue42 apps for which it has been enabled. It offers standard cut/copy/paste actions, zoom and spelling controls:
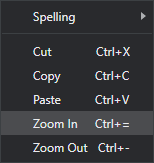
Enable the context menu:
- globally for all apps, under the
"windows"top-level key in thesystem.jsonfile:
{
    "windows": {
        "contextMenu": {
            "enabled": true
        }
    }
}- per app, under the
"details"top-level key of the app configuration file:
[
    {
        "details": {
            "contextMenuEnabled": true
        }
    }
]
Telemetry Data
Available since Glue42 Enterprise 3.17
Glue42 Enterprise exposes telemetry data containing info related to the system environment and the running web apps.
On a system level, you can gather data about:
- Focus duration, start and stop events for apps.
- Step-by-step system startup flow events. Can be used to investigate slow startups.
- All system log entries.
- System CPU and memory usage.
For web apps, you can gather data about:
- All network request per app.
- All app console logs.
- Web page exceptions caught by the window
"error"event. - CPU and memory usage per process.
Telemetry data events can also be cleared. To get or clear telemetry data, you must invoke the "T42.Telemetry" Interop method passing the respective command and configuration for getting or clearing telemetry data entries.
Configuration
To enable or disable telemetry data, use the "telemetry" top-level key of the system.json configuration file of Glue42 Enterprise:
{
    "telemetry": {
        "enabled": false
    }
}
Getting Data
To get telemetry data, invoke the "T42.Telemetry" Interop method. As a second argument for the invocation, pass an object with command and config properties. For the command property, use "GetEvents" as a value to specify that the method should get telemetry data. Use the config property to specify what type of telemetry data you want to receive - for the system environment, for the running web apps, or for both:
// Name of the Interop method.
const methodName = "T42.Telemetry";
// Settings for the method invocation.
const args = {
    command: "GetEvents",
    config: { system: true, apps: true }
};
// Invoking the "T42.Telemetry" method to get telemetry data.
const result = await glue.interop.invoke(methodName, args);
// Extracting the returned data object.
const data = result.returned;

console.log(data);
The object passed as an argument for the method invocation has the following properties:
| Property | Type | Description |
|---|---|---|
command |
"GetEvents" | "ClearEvents" |
Specifies the action to execute - get or clear telemetry data. |
config |
object |
Specifies what type of telemetry data to get or clear. |
The config object for requesting telemetry data has the following properties:
| Property | Type | Description |
|---|---|---|
system |
boolean | object |
Specifies whether to get system data. Pass an object to refine the data request (see Refining Telemetry Requests). |
apps |
boolean | object |
Specifies whether to get web app data. Pass an object to refine the data request (see Refining Telemetry Requests). |
Data Shape
The object returned from the invocation of the "T42.Telemetry" Interop method when requesting telemetry data, has the following shape:
const data = {
    type: "gd",
    data: {
        system: {},
        apps: [],
        stores : {}
    }
};
The system object has the following properties:
| Property | Type | Description |
|---|---|---|
logErrors |
object[] |
Each item of the array holds an error entry from the system logs. |
startupEvents |
object[] |
Each item of the array holds information about a single startup flow event. |
journeyEvents |
object[] |
Each item of the array holds information about focus duration, start and stop events for a specific web app. |
perfData |
object |
Holds information about overall and per app CPU and memory usage. |
The apps property is an array of objects with the following properties:
| Property | Type | Description |
|---|---|---|
app |
string |
The app name as defined in its configuration file. |
instance |
string |
Unique ID within the Glue42 environment. |
info |
object |
Contains specific data about the app - instance ID, API version, window type, URL and more. |
requests |
object[] |
Each item of the array holds information about a specific network request made by the app. |
console |
object[] |
Each item of the array holds information about a message logged to the console. |
errors |
object[] |
Each item of the array holds information about a web page exception caught by the window "error" event. |
The stores object has the following properties:
| Property | Type | Description |
|---|---|---|
logs |
object |
Contains information about the number of items in the store, the total store size and the time of the last update. |
journeyEvents |
object |
Contains information about the number of items in the store, the total store size and the time of the last update. |
requests |
object |
Contains information about the number of items in the store, the total store size and the time of the last update. |
console |
object |
Contains information about the number of items in the store, the total store size and the time of the last update. |
Refining Telemetry Requests
When requesting telemetry data, you can specify what type of system and web app data entries you want to receive. Use the system and apps properties of the config object refine your telemetry request:
const methodName = "T42.Telemetry";
const args = {
    command: "GetEvents",
    config: {
        // Omit data about startup flow events and CPU and memory usage.
        system: { withStartupEvents: false, withPerfData: false },
        // Omit data about console messages logged by web apps.
        apps: { withConsole: false }
    }
};
const result = await glue.interop.invoke(methodName, args);
const data = result.returned;

console.log(data);
The system property of the config object accepts an object with the following properties:
| Property | Type | Description |
|---|---|---|
withStartupEvents |
boolean |
Whether to receive data about the system startup flow events. |
withPerfData |
boolean |
Whether to receive data about system CPU and memory usage. |
withJourneyEvents |
boolean |
Whether to receive data about focus duration, start and stop events for web apps. |
withLog |
boolean |
Whether to receive data about system log entries. |
The apps property of the config object accepts an object with the following properties:
| Property | Type | Description |
|---|---|---|
withConsole |
boolean |
Whether to receive data about console messages logged by web apps. |
withRequests |
boolean |
Whether to receive data about network requests made by web apps. |
withErrors |
boolean |
Whether to receive data about web page exceptions caught by the window "error" event. |
Clearing Data
To clear telemetry data, invoke the "T42.Telemetry" Interop method and pass "ClearEvents" as a value to the command property of the argument object for the method invocation. Use the config object to specify what type of telemetry data entries to clear:
// Name of the Interop method.
const methodName = "T42.Telemetry";
// Settings for the method invocation.
const args = {
    command: "ClearEvents",
    config: {
        requests: true,
        journeyEvents: true,
        logs: true,
        console: true
    };
};
// Invoking the "T42.Telemetry" method to clear telemetry data.
const result = await glue.interop.invoke(methodName, args);
// Extracting the returned data object.
const data = result.returned;

// Will print an empty object, as all entries have been cleared.
console.log(data);
The config object for clearing telemetry data has the following properties:
| Property | Type | Description |
|---|---|---|
requests |
boolean |
Whether to clear data about network requests made by web apps. |
journeyEvents |
boolean |
Whether to clear data about focus duration, start and stop events for web apps. |
logs |
boolean |
Whether to clear data about system log entries. |
console |
boolean |
Whether to clear data about console messages logged by web apps. |
Jump List
Available since Glue42 Enterprise 3.15
The jump list is a configurable categorized list of actions that can be shown in the context menu when the user right-clicks on a taskbar icon of a Glue42 enabled app or a group of such icons:
Note that currently the jump list isn't available for web groups.
Configuration
The jump list can be enabled, disabled and configured globally and per app. The app configuration will override the global system configuration.
Note that the jump list configuration allows you to enable or disable the jump list and configure the predefined actions (e.g., change their names or icons), but in order to add custom jump list categories and actions for your apps, you must use the jump list API.
To configure the jump list system-wide, use the "jumpList" property of the "windows" top-level key in the system.json file of Glue42 Enterprise. The following is the default system jump list configuration:
{
    "windows": {
        "jumpList": {
            "enabled": true,
            "categories": [
                {
                    "title": "Tasks",
                    "actions": [
                        {
                            "icon": "%GDDIR%/assets/images/center.ico",
                            "type": "centerScreen",
                            "singleInstanceTitle": "Center on Primary Screen",
                            "multiInstanceTitle": "Center all on Primary Screen"
                        }
                    ]
                }
            ]
        }
    }
}
The "jumpList" object has the following properties:
| Property | Type | Description |
|---|---|---|
"enabled" |
boolean |
If true (default), will enable the jump list. |
"categories" |
object[] |
Categorized lists with actions to execute when the user clicks on them. |
Each object in the "categories" array has the following properties:
| Property | Type | Description |
|---|---|---|
"title" |
string |
Title of the category to be displayed in the context menu. |
"actions" |
object[] |
List of actions contained in the category. |
Each object in the "actions" array has the following properties:
| Property | Type | Description |
|---|---|---|
"icon" |
string |
Icon for the action to be displayed in the context menu. Must point to a local file. |
"type" |
string |
Type of the predefined action to execute. |
"singleInstanceTitle" |
string |
Title of the action to be displayed in the context menu when there is a single instance with a single taskbar icon. |
"multiInstanceTitle" |
string |
Title of the action to be displayed in the context menu when there are multiple instances with grouped taskbar icons. |
To override the system configuration per app, use the "jumpList" property of the "details" top-level key in the app configuration file. The following example demonstrates how to disable the jump list for an app:
{
    "title": "My App",
    "type": "window",
    "name": "my-app",
    "details": {
        "url": "https://downloadtestfiles.com/",
        "jumpList": {
            "enabled": false
        }
    }
}
Predefined Actions
To use a predefined action, set the "type" property of the action object to the respective value (see Jump List > Configuration). The following are the currently supported predefined actions:
"centerScreen"- centers an app or a group of app instances on the primary screen. This action is extremely useful when you have many windows open on multiple displays and can't find the app you need. Use this action to find an app that: you may have moved to another screen or outside the screen bounds altogether; may be hidden behind other windows; may have been resized and become too small to notice; or may have simply blended visually with other apps:
"newWorkspace"- opens a new Workspace. This action by default is part of the jump list for the Workspaces App. Clicking on the action opens a new empty Workspace in the last opened instance of the Workspaces App. If this action is part of the jump list for another app and the Workspaces App isn't currently open when the user clicks on the action, it will be started:

Jump List API
Available since Glue42 Enterprise 3.17
The jump list API is accessible through the GDWindow object which describes an instance of a Glue42 Window:
const myWindow = glue.windows.my();
// Check whether the jump list is enabled for the current window.
const isJumpListEnabled = await myWindow.jumpList.isEnabled();
Enable or Disable the Jump List
To enable or disable the jump list dynamically, use the setEnabled() method and pass a Boolean value as an argument:
const myWindow = glue.windows.my();

// Checking whether the jump list is enabled for the current window.
const isJumpListEnabled = await myWindow.jumpList.isEnabled();

if (!isJumpListEnabled) {
    // Enabling the jump list.
    await myWindow.jumpList.setEnabled(true);
};
Categories
Jump list categories are used for grouping actions in a section under a common name. You can find a category by name, get a list of all available categories, create a new category or remove an existing one. The categories API is accessible through the jumpList.categories object.
To find a category by name, use the find() method:
const myCategory = await myWindow.jumpList.categories.find("My Category");To get a list of all available categories, use the list() method:
const categoryList = await myWindow.jumpList.categories.list();To create a category, use the create() method. Pass a title for the category and a list of JumpListActionSettings objects describing the actions in the category:
// Category settings.
const title = "My Category";
const actions = [
   {
        // Icon for the action. Must point to a local file.
        icon: "../images/action-one.ico",
        // Callback that will be executed when the user clicks on the action.
        callback: () => console.log("Action 1"),
        // Title of the action when there is a single instance with a single taskbar icon.
        singleInstanceTitle: "Execute Action 1",
        // Title of the action when there are multiple instances with grouped taskbar icons.
        multiInstanceTitle: "Execute Action 1 for All"
    },
    {
        icon: "../images/action-two.ico",
        callback: () => console.log("Action 2"),
        singleInstanceTitle: "Execute Action 2",
        multiInstanceTitle: "Execute Action 2 for All"
    }
];

// Creating a category.
await myWindow.jumpList.categories.create(title, actions);
To remove a category, use the remove() method and pass the category title as an argument:
await myWindow.jumpList.categories.remove("My Category");Actions
Each JumpListCategory object has an actions property through which you can access the actions API. You can create, remove or list all available actions in the current category.
To get a list of all available actions in a category, use the list() method:
const myCategory = await myWindow.jumpList.categories.find("My Category");

const actions = await myCategory.actions.list();
To create an action in a category, use the create() method. Pass a list of JumpListActionSettings objects describing the actions.
The following example demonstrates creating an action in the "Tasks" category that will toggle the Glue42 theme:
// Finding a category.
const category = await myWindow.jumpList.categories.find("Tasks");
// Action settings.
const actions = [
    {
        icon: "../images/toggle-theme.ico",
        // This action will toggle the Glue42 theme.
        callback: async () => {
            const currentTheme = await glue.themes.getCurrent();
            if (currentTheme.name === "dark") {
                glue.themes.select("light");
            } else {
                glue.themes.select("dark");
            };
        },
        singleInstanceTitle: "Toggle Theme",
        multiInstanceTitle: "Toggle Theme"
    }
];

// Creating actions for an existing category.
await category.actions.create(actions);
To remove one or more actions from a category, use the remove() method and pass a list of JumpListActionSettings objects to remove:
const actions = [
   {
        icon: "../images/action-one.ico",
        callback: () => console.log("Action 1"),
        singleInstanceTitle: "Execute Action 1",
        multiInstanceTitle: "Execute Action 1 for All"
    },
    {
        icon: "../images/action-two.ico",
        callback: () => console.log("Action 2"),
        singleInstanceTitle: "Execute Action 2",
        multiInstanceTitle: "Execute Action 2 for All"
    }
];

// Removing actions from a category.
await category.actions.remove(actions);
Hotkeys
The Hotkeys API allows apps to register key combinations and receive notifications when a key combination is pressed by the user irrespectively of whether the app is on focus or not. Hotkeys are useful for web apps that don't have access to system resources and can't register global shortcuts.
Configuration
You can control the hotkeys behavior from the system.json file under the "hotkeys" top-level key. You can find the system.json in the %LocalAppData%\Tick42\GlueDesktop\config folder.
Hotkeys configuration example:
{
    "hotkeys": {
        "enabled": true,
        "blacklist": ["appManager"],
        "reservedHotkeys": ["ctrl+c", "ctrl+p", "ctrl+s"]
    }
}
The hotkeys object has the following properties:
| Property | Type | Description |
|---|---|---|
"enabled" |
boolean |
If true, hotkeys will be enabled. |
"whitelist" |
string[] |
List of apps that can register hotkeys. Any app not on the list won't be able to register hotkeys. |
"blacklist" |
string[] |
List of apps that can't register hotkeys. Any app not on the list will be able to register hotkeys. |
"reservedHotkeys" |
string[] |
List of reserved (system or other) hotkeys that can't be overridden by other apps. |
Hotkeys API
The Hotkeys API is accessible through the glue.hotkeys object. To register a hotkey, your app must be using a Glue42 JavaScript version newer than 4.3.5.
To register a hotkey, use the register() method:
// Define a hotkey object.
const hotkeyDefinition = {
    hotkey: "shift+alt+c",
    description: "Open Client Details"
};

// This function will be invoked when the hotkey is pressed.
const hotkeyHandler = () => {
    glue.appManager.application("Client Details").start();
};

// Register the hotkey.
await glue.hotkeys.register(hotkeyDefinition, hotkeyHandler);
To remove a hotkey, use the unregister() and pass the value of the hotkey combination as an argument:
await glue.hotkeys.unregister("shift+alt+c");To remove all hotkeys registered by your app, use the unregisterAll() method:
await glue.hotkeys.unregisterAll();To check if your app has registered a specific hotkey, use the isRegistered() method:
// Returns a Boolean value.
const isRegistered = glue.hotkeys.isRegistered("shift+alt+c");
Hotkeys View
There is a utility view that allows you to see all hotkeys registered by different apps. You can open it from the Glue42 Enterprise tray icon menu - right-click on the tray icon to display the menu. When you click on the Hotkeys item you will see a list of the hotkeys registered by your app:
For a complete list of the available Hotkeys API methods and properties, see the Hotkeys API Reference Documentation.
Displays
Available since Glue42 Enterprise 3.9
Glue42 Enterprise provides a way for apps to programmatically capture screenshots of the available monitors. Based on custom logic you can capture one or all monitors in order to save a snapshot of the visual state at a given moment.
Configuration
To enable display capturing you must add the "allowCapture" property to your app configuration file and set it to true.
{
    "name": "MyApp",
    "type": "window",
    "allowCapture": true,
    "details": {
        "url": "http://localhost:3000"
    }
}
Displays API
The Displays API is accessible through the glue.displays object.
All Displays
To get all displays, use the all() method. It returns an array of all available Display objects:
const allDsiplays = await glue.displays.all();Primary Display
You can get the primary display with the getPrimary() method:
// Returns the primary display.
const primaryDisplay =  await glue.displays.getPrimary();
Example of finding and capturing the primary display:
const display = await glue.displays.getPrimary();
const screenshot = await display.capture({ scale:0.5 });
Specific Display
To get a specific display, use the get() method. It accepts a display ID as an argument and resolves with a Display object:
const displayID = 2528732444;

// returns a display by ID
const display = await glue.displays.get(displayID);
The Display Object
The Display object has the following properties:
| Property | Description |
|---|---|
id |
Unique identifier associated with the display. |
bounds |
A Bounds object with height, width, left and top properties, describing the bounds of the display. |
workArea |
A Bounds object describing the working area of the display (the desktop area, excluding taskbars, docked windows and toolbars). |
dpi |
Dots per inch resolution of the display. |
isPrimary |
A boolean value specifying whether this is the primary display. |
index |
Index assigned to the display by the operating system. |
name |
Name assigned to the display by the operating system. |
aspectRatio |
Display aspect ratio (e.g., 16:9). |
scaleFactor |
The scale factor of the returned display (e.g., 1.25 = 125%). |
Capturing All Displays
To capture all displays, use the captureAll() method. It accepts a CaptureAllOptions object and returns a Base64 encoded string or an array of Base64 encoded strings depending on the specified combined option.
The following example demonstrates how to capture all available displays and combine the screenshots into a single image with width set to 2000 pixels. The aspect ratio of the combined images will be preserved (the omitted keepAspectRatio property in the size object defaults to true) and the images will be arranged the way you have arranged your displays from your operating system settings:
const screenshot = await glue.displays.captureAll({ combined: true, size: { width: 2000 } });The CaptureAllOptions object has the following properties:
| Property | Type | Description |
|---|---|---|
combined |
boolean |
Required. If true, will return a single image of all captured displays. If false, will return separate images for all captured displays. |
size |
object |
Optional. Accepts either a ScaleOptions or an AbsoluteSizeOptions object, specifying the size of the output image. |
Capturing Single Displays
To capture a single display, use the capture() method at top level of the API or on a Display instance.
When you use the capture() method at top level of the API, pass a CaptureOptions object. The following example demonstrates how to use the display ID to find and capture the desired display and also how to specify capturing options. The width and height of the output image will be half the width and height of the captured monitor. The captured image is returned as a Base64 encoded string:
const displayID = 2528732444;
const captureOptions = {
    id: displayID,
    size: { scale: 0.5 }
}

const screenshot = await glue.displays.capture(captureOptions);
The CaptureOptions object has the following properties:
| Property | Type | Description |
|---|---|---|
id |
number |
Required. ID of the targeted display. |
size |
object |
Optional. Accepts either a ScaleOptions or an AbsoluteSizeOptions object, specifying the size of the output image. |
The ScaleOptions object has only one property - scale, which accepts a number. The value you pass to it specifies the size of the output image relative to the actual screen size. For instance, if you use scale: 0.5 the height and width of the output image will be half the height and width of the captured screen.
The AbsoluteSizeOptions object has the following properties, all of which are optional:
| Property | Type | Description |
|---|---|---|
width |
number |
Specifies the width of the output image. Defaults to the captured display width. |
height |
number |
Specifies the height of the output image. Defaults to the captured display height. |
keepAspectRatio |
boolean |
Whether to keep the aspect ratio of the output image when you specify width and/or height of the output image. If true and both width and height are set, then the specified width will be used as a basis for the output image aspect ratio. |
When you use the capture() method of a Display instance, pass either a ScaleOptions or an AbsoluteSizeOptions object, specifying the size of the output image. The following example demonstrates how to find and capture all non-primary displays:
const screenshots = await Promise.all(
            // Get all displays.
            (await glue.displays.all())
            // Filter out the primary display.
            .filter(display => !display.isPrimary)
            .map(display => display.capture({ scale: 0.5 })));
Capturing Windows & Window Groups
You can use the capture() method of a Glue42 Window instance or a Glue42 Window group to capture the respective window or window group. This method works also for minimized windows and window groups but doesn't work for hidden windows.
// Capture the current window.
const windowScreenshot = await glue.windows.my().capture();

// Capture the current group.
const groupScreenshot = await glue.windows.groups.my.capture();
Events
Available since Glue42 Enterprise 3.13
The onDisplayChanged() method allows you to handle the event that fires when a display has been modified - its resolution or position has changed, a display has been connected or disconnected, etc. Pass a handler that will be invoked each time a display changes and use the list of Display objects that it receives as an argument to react to the changes:
const handler = (displays) => {
    // React to DPI changes, display connected or disconnected, monitor position changed, etc.
    console.log(displays);
};

glue.displays.onDisplayChanged(handler);
For a complete list of the available Displays API methods and properties, see the Displays API Reference Documentation.
Logging
Available since Glue42 Enterprise 3.9
Glue42 Enterprise offers a Logger API which enables JavaScript apps to create a hierarchy of sub-loggers mapped to app components where you can control the level of logging for each component. You can also route the output of log messages (depending on the logging level) to a variety of targets - the developer console or an external output (usually a rolling file on the desktop, but actually any target the log4net library supports).
Note that you can also customize the logging mechanism of Glue42 Enterprise through its logging configuration.
Adding logging to files to your JavaScript apps can be helpful in a variety of ways. Having a well-designed and meaningful logging structure in your apps and their components can save a lot of time when debugging an app during development or troubleshooting problems with an app in production.
Configuration
Logging for apps in Glue42 Enterprise is disabled by default. To allow it, use the "allowLogging" top-level key in the app configuration file:
{
    "allowLogging": true
}
Logger API
The Logger API is accessible through the glue.logger object.
Logger instances have a subLogger() method that creates a new sub-logger of the current logger. The name of each logger instance is a dot delimited string containing all names of the loggers constituting an hierarchy line from the base logger (the app name) down to the current logger. This allows an effective and intuitive logging structure which can be easily adjusted to the component hierarchy in your app. For instance, a structure like app-name.main-component.sub-component gives you a clear idea from where the respective log entry originates and helps you find the necessary information much faster in a log file that may (and usually does) contain thousands of entries.
To use a logger in your Glue42 enabled apps, create a logger instance with the subLogger() method and assign the logger a name:
const logger = glue.logger.subLogger("main-component");Next, set the logging level at which to publish log entries to the file. Use the publishLevel() method of the logger instance:
logger.publishLevel("info");Everything at and above the specified logging level will be logged, all else will be skipped. The available logging levels are "trace", "debug", "info", "warn" and "error".
To log messages, either use the log() method of the logger instance, or the respective logging level methods - error(), trace(), etc.
// The log() method accepts a message and logging level as arguments.
logger.log("Couldn't load component!", "error");

// or

// Each logging level method accepts only a message as an argument.
logger.error("Couldn't load component!");
Location & Output
User app log files are located in the %LocalAppData%\Tick42\UserData\<ENV>-<REG>\logs\applications folder, where <ENV>-<REG> must be replaced with the environment and region of your Glue42 Enterprise copy (e.g., T42-DEMO). A separate log file is created for each app that has logging enabled. The file is named after the app and is created after the app starts to output log entries. All instances of an app log to the same file.
The log file entries are in the following format:
[<DATE>T<TIME>] [<LOGGING_LEVEL>] [<INSTANCE_ID>] [<LOGGER_NAME>] - <LOG_MESAGE>Here is how an actual entry in a log file looks like:
[2020-03-11T14:27:58.087] [ERROR] [30760_11] [client-list.test-logger] - test-error
    at t.error (http://localhost:22080/client-list/desktop-4.8.0.js:1:39269)
    at <anonymous>:1:8
For a complete list of the available Logger API methods and properties, see the Logger API Reference Documentation.
Streaming & Consuming System Logs
Available since Glue42 Enterprise 3.19
You can configure Glue42 Enterprise to stream the system logs so that they can be consumed by your apps. You can specify the log level and the interval at which the logs to be streamed. Use the "streaming" property of the "logging" top-level key of the system.json system configuration file of Glue42 Enterprise to specify the log streaming configuration:
{
    "logging": {
        "streaming": {
            "enabled": true,
            "minLevel": "warn",
            "interval": 60
        }
    }
}
The "streaming" object has the following properties:
| Property | Type | Description |
|---|---|---|
"enabled" |
boolean |
If true, will enable streaming system log entries. |
"minLevel" |
string |
The minimum level of the log entries to be streamed. |
"interval" |
number |
Interval in seconds at which the log entries will be streamed. |
To consume the log entries in your apps, you must implement and register an Interop method named "T42.Logs.Listen". This method will be invoked whenever Glue42 Enterprise streams the system logs. The method handler will receive an object with an entries property as an argument which holds an array of objects each describing the individual log entries:
const name = "T42.Logs.Listen";
const handler = logs => logs.entries.forEach(e => console.log(e.source, e.logEntry));

await glue.interop.register(name, handler);
Each log entry has the following properties:
| Property | Type | Description |
|---|---|---|
source |
"application" | "bridge" | "gw" |
Source of the system log entry. Log entries may come from the Glue42 Enterprise app itself, from the internal window management app, or from the Glue42 Gateway. |
logEntry |
object |
A LoggingEvent object as described in the log4js-node types. |
Cookies
Available since Glue42 Enterprise 3.16
Web apps can retrieve, filter, set and remove cookies programmatically by using the Glue42 Cookies API.
Configuration
By default, Glue42 enabled web apps aren't allowed to manipulate cookies. To allow an app to manipulate cookies, use the "allowCookiesManipulation" property of the "details" top-level key in the app configuration file:
{
    "details": {
        "allowCookiesManipulation": true
    }
}
Cookies API
The Cookies API is accessible through the glue.cookies object.
Get
To retrieve all cookies, use the get() method:
const allCookies = await glue.cookies.get();The get() method returns a list of Cookie objects.
To filter the cookies, pass a CookiesGetFilter object with the properties which you want to use as a filter.
The following example demonstrates filtering cookies by domain:
const filter = { domain: "glue42.com" };

// Get a list of cookies for the same domain.
const filteredCookies = await glue.cookies.get(filter);
The CookiesGetFilter object has the following optional properties, which you can use in any combination to filter the cookies:
| Property | Type | Description |
|---|---|---|
url |
string |
Retrieves the cookies which are associated with the specified URL. If not specified, will retrieve the cookies for all URLs. |
name |
string |
Filters the cookies by name. |
domain |
string |
Retrieves the cookies whose domains match or are subdomains of the specified domain. |
path |
string |
Retrieves the cookies whose path matches the specified path. |
secure |
boolean |
Filters cookies by their Secure attribute. |
session |
boolean |
If true, will return only the session cookies. If false, will return only the persistent cookies. |
Set
To create a cookie, use the set() method. It accepts as a required argument a CookiesSetDetails object with a required url property:
const cookie = {
    url: "https://example.com",
    name: "MyCookie",
    value: "42"
};

await glue.cookies.set(cookie);
The CookiesSetDetails object has the following properties:
| Property | Type | Description |
|---|---|---|
url |
string |
Required. URL to associate with the cookie. |
name |
string |
Name for the cookie. |
value |
string |
Value for the cookie. |
domain |
string |
Domain for the cookie. Will be normalized with a preceding dot in order to be valid for subdomains too. |
path |
string |
Path for the cookie. |
secure |
boolean |
If true, the cookie will be marked with a Secure attribute. Default is false, unless the SameSite attribute has been set to None. |
httpOnly |
boolean |
If true, the cookie will be marked with an HttpOnly attribute. Default is false. |
expirationDate |
number |
The expiration date of the cookie as a number of seconds since the UNIX epoch. If not specified, the cookie will become a session cookie and won't be persisted between sessions. |
sameSite |
"unspecified" | "no_restriction" | "lax" | "strict" |
The value to be applied to the SameSite attribute. If set to "no_restriction", the secure property will be set automatically to true. Default is "lax". |
Remove
To remove a cookie, use the remove() method and pass the cookie URL and name:
const url = "https://example.com";
const name = "MyCookie";

await glue.cookies.remove(url, name);
Dialogs
Available since Glue42 Enterprise 3.18
Glue42 Enterprise offers default confirmation dialogs that will be shown on system shutdown or restart and when a window that prevents closing is about to be closed:
Configuration
The default dialogs are configurable via the "dialogs" top-level key of the system.json system configuration file of Glue42 Enterprise. You can specify size for them, disable them, or provide a URL pointing to you own custom dialog app to be used by Glue42 Enterprise:
{
    "dialogs": {
        "url": "https://my-custom-dialog.com",
        "width": 380,
        "height": 150,
        "enableDefaultDialogs": {
            "preventShutdown": false,
            "preventWindowClose": false
        }
    }
}
Using Dialogs Programmatically
The showDialog() method of the GDWindow object allows you to show dialogs at runtime. It accepts a DialogOptions object as an argument in which you can specify dialog options - select a predefined Glue42 dialog type and fine-tune it, or create a completely customized one. The only required options are type and message for the dialog to show.
Predefined Dialogs
The following dialog types are available:
| Dialog Type | Description |
|---|---|
"YesNo" |
Contains "Yes" and "No" buttons. |
"YesNoCancel" |
Contains "Yes", "No" and "Cancel" buttons. |
"OkCancel" |
Contains "OK" and "Cancel" buttons. |
"Ok" |
Contains an "OK" button. |
"SingleInputDialog" |
Contains an input field, "Save" and "Don't Save" buttons. Available since Glue42 Enterprise 3.22. |
The following example demonstrates using a predefined Glue42 dialog:
const myDialog = {
    type: "SingleInputDialog",
    title: "Email Required",
    message: "Please, provide your email address:",
    inputPlaceholder: "john.doe@example.com",
    inputPattern: "[a-z0-9]@my-org.com",
    inputPatternErrorMessage: "Invalid email address!",
    size: { height: 220 }
};

await myWindow.showDialog(myDialog);
Custom Dialogs
The following example demonstrates creating a custom dialog using the options provided in the DialogOptions object:
const myDialog = {
    type: "MyCustomDialog",
    title: "Custom Title",
    message: "Custom Message",
    showTimer: true,
    timerDuration: 10,
    size: { height: 180 },
    showAffirmativeButton: true,
    affirmativeButtonName: "Confirm"
};

await myWindow.showDialog(myDialog);
Dialog Mode
The DialogOptions object has an optional mode property which determines the blocking behavior of the dialog. The mode property is of type DialogMode which is an enumeration with two possible values:
| Value | Description |
|---|---|
"WindowContainer" |
Only the container (a Workspaces Frame, or a Glue42 Window group) of the window that is showing the dialog will be blocked for user interaction. All windows within a blocked container are blocked too. |
"Global" |
All visible containers (including frameless Glue42 Windows) will be blocked for user interaction. |
const myDialog = {
    type: "MyCustomDialog",
    title: "Custom Title",
    message: "Custom Message",
    // Will block all visible window containers for user interaction.
    mode: "Global"
};

await myWindow.showDialog(myDialog);
Functionality
To provide functionality to the dialog buttons or react when the user closes the dialog, use the DialogResult object returned from showing the dialog. The result is returned when the user clicks on a dialog button or closes the dialog.
The following example demonstrates showing a predefined Glue42 dialog with "OK" and "Cancel" buttons and responding to the user interaction:
const myDialog = {
    type: "OkCancel",
    title: "My Dialog Title",
    message: "My dialog message."
};

const handleDialogResult = (action, button) => {
    if (action === "closed") {
        // React to user closing the dialog.
        console.log("Dialog closed.");
        return;
    } else {
        if (button === "affirmative") {
            // React to user clicking the "OK" button.
            console.log("OK button clicked.");
        } else {
            // React to user clicking the "Cancel" button.
            console.log("Cancel button clicked.");
        };
    };
};

const { action, button } = await myWindow.showDialog(myDialog);

handleDialogResult(action, button);
Zooming
Glue42 Enterprise supports zooming in and out of windows of JavaScript apps. Zooming can be controlled via configuration (system-wide or per app) or programmatically via the available methods/properties of a window instance.
You can zoom in and out of windows in several ways:
CTRL + =(zoom in) andCTRL + -(zoom out);CTRL + MOUSE SCROLL;CTRL + 0- resets to the default zoom factor;- mouse pad gestures;
- using the right-click context menu (if enabled);
Note that zooming is based on domain - i.e., if you open two apps with the same domain and change the zoom factor of one of them, the zoom factor of the other will change accordingly.
Note that if your app logic includes both zooming a window and retrieving its size with the window.innerHeight or window.innerWidth DOM properties, you have to consider the fact that the browser will report adjusted size values based on the zoom factor. In such cases, it's recommended to use window.outerHeight and window.outerWidth, or the bounds property of a GDWindow instance.
Configuration
You can configure window zooming system-wide from the system.json file in the %LocalAppData%\Tick42\GlueDesktop\config folder. Use the "zoom" property under the "windows" top-level key:
{
    "windows": {
        "zoom": {
            "enabled": true,
            "mouseWheelZoom": true,
            "factors": [25, 33, 50, 67, 75, 80, 90, 100, 110, 125, 150, 175, 200, 250, 300, 400, 500],
            "defaultFactor": 100
        }
    }
}| Property | Type | Description |
|---|---|---|
"enabled" |
boolean |
If true, zooming will be enabled. |
"mouseWheelZoom" |
boolean |
If true, will enable zooming with CTRL + mouse scroll. |
"factors" |
number[] |
List of zoom factors to be used when the user zooms in or out of the window. The factors must be in ascending order and may have integer or floating point values. Zooming will only work with factor values within the range of 25 to 500. Avoid passing negative values when setting the zoom factor (via configuration or programmatically), as this will cause unexpected behavior. |
"defaultFactor" |
number |
Default zoom factor within the range of 25 to 500. Avoid negative values. |
You can also enable zooming per app which will override the system-wide zoom configuration. Use the "zoom" property under the "details" top-level key of the app configuration file:
[
    {
        "title": "MyApp",
        "type": "window",
        "name": "myApp",
        "details": {
            "url": "http://localhost:22080/my-app/index.html",
            "zoom": {
                "enabled": true,
                "mouseWheelZoom": true,
                "factors": [25, 33, 50, 67, 75, 80, 90, 100, 110, 125, 150, 175, 200, 250, 300, 400, 500],
                "defaultFactor": 100
            }
        }
    }
]
Using Zoom Programmatically
There are several methods and properties exposed on the window instance, which you can use to control zoom behavior.
Get the current zoom factor:
const win = glue.windows.my();

console.log(win.zoomFactor);
Zoom in:
// Will zoom in the window to the next factor in the "factors" array.
await win.zoomIn();
Zoom out:
// Will zoom out the window to the previous factor in the "factors" array
await win.zoomOut();
Set a desired zoom factor:
await win.setZoomFactor(number);Carefully consider all cases if you intend to pass a zoom factor value based on a logic in your app. Negative values will cause unexpected behavior. Passing positive values lower than 25 will cause zoom out with a factor of 25, positive values higher than 500 will cause zoom in with a factor of 500 and passing zero as a factor will preserve the previous zoom factor.
Listening for zoom factor changes:
// Returns a function which you can use to unsubscribe from events for zoom factor changes.
const unsubscribe = win.onZoomFactorChanged(w => {
    console.log(`Zoom factor changed to ${w.zoomFactor}`)
});

unsubscribe();
Environment Variables
Available since Glue42 Enterprise 3.21
Glue42 apps can be allowed runtime access to the available environment variables through configuration.
Configuration
To allow an app to access environment variables, use the "allowEnvVars" property of the "details" top-level key in the app configuration:
{
    "details": {
        "allowEnvVars": true
    }
}
Runtime Access
To access the available environment variables at runtime, use the env property of the glue42gd object attached to the global window object. The env property is an object containing all environment variables as properties:
const envVars = glue42gd.env;

Object.entries(envVars).forEach((envVar) => {
    const [envVarName, envVarValue] = envVar;

    console.log(`${envVarName}: "${envVarValue}"`);
});
Request Headers
Available since Glue42 Enterprise 3.21
You can allow Glue42 web apps to manipulate the headers for web requests at runtime.
Configuration
To allow web apps to manipulate request headers at runtime, use the "allowHeadersManipulation" top-level key of the app configuration:
{
    "allowHeadersManipulation": true
}
Runtime Manipulation
To manipulate the request headers for web requests at runtime, use the customHeaders property of the glue42gd object attached to the global window object.
To set custom request headers, use the set() method. You can use the returned header ID later to retrieve or remove the header:
const header = { "My-Custom-Header": "custom-header-value" };

const headerId = await glue42gd.customHeaders.set(header);
You can also supply a web request filter as a second argument to set(), specifying which requests to target:
const header = { "My-Custom-Header": "custom-header-value" };
const filter = {
    urls: ["https://my-app.com/assets/*"],
    applications: ["my-app"],
    types: ["mainFrame", "image", "stylesheet"]
};

const headerId = await glue42gd.customHeaders.set(header, filter);
The filter object has the following properties:
| Property | Type | Description |
|---|---|---|
urls |
string[] |
Array of URLs. The headers of all web requests sent to the specified URLs will be modified. You can use the * wildcard symbol in the URL. |
applications |
string[] |
Array of Glue42 app names. The headers of all web requests sent from the specified apps will be modified. |
types |
string[] |
Array of web request types. The possible array item values are "mainFrame", "subFrame", "stylesheet", "script", "image", "font", "object", "xhr", "ping", "cspReport", "media", "webSocket" and "other". You can target requests originating from the main frame or the sub frames, or specify the content type of the targeted web request. |
To retrieve all custom request headers, use the getAll() method:
const allCustomHeaders = await glue42gd.customHeaders.getAll();To retrieve a specific header, use the get() method and pass its ID as an argument:
const header = await glue42gd.customHeaders.get(headerId);To remove all custom request headers, use the removeAll() method:
await glue42gd.customHeaders.removeAll();To remove a specific header, use the remove() method and pass its ID as an argument:
await glue42gd.customHeaders.remove(headerId);Proxy Settings
You can configure the proxy settings on a system level for all users, or allow Glue42 apps to manipulate them at runtime if different user groups must use different proxy settings.
Configuration
Proxy settings can be changed from the system configuration of Glue42 Enterprise. Use the "proxy" top-level key of the system.json file:
{
    "proxy": {
        "useSystemSettings": false,
        "url": "https://my-proxy-url.com"
    }
}
The "proxy" key has the following properties:
| Property | Type | Description |
|---|---|---|
"useSystemSettings" |
boolean |
If true (default), will use the OS proxy settings. |
"url" |
string |
Proxy URL to use. |
"pacScript" |
string |
URL to a proxy auto-configuration script (PAC). |
"autodetectTimeoutMs" |
number |
Interval in milliseconds to wait for response when attempting to detect a PAC script. |
"rules" |
string |
Semicolon-delimited list of proxy rules. For syntax, see the Electron Set Proxy Config documentation. |
"bypassRules" |
string |
Semicolon-delimited list of host patterns that will always use direct connection. For syntax, see the Electron Set Proxy Config documentation. |
To allow an app to manipulate proxy settings at runtime, use the "allowProxySettingManipulation" property of the "details" top-level key in the app configuration file:
{
    "details": {
        "allowProxySettingManipulation": true
    }
}
Runtime Manipulation
Available since Glue42 Enterprise 3.18
To manipulate the proxy settings at runtime, use the glue42gd object injected in the global window object:
const settings = {
    useSystemSettings: false,
    url: "https://my-proxy-url.com"
};

// Set proxy settings.
glue42gd.setProxySettings(settings);

// Get proxy settings.
const proxySettings = getProxySettings();
The object passed as an argument to setProxySettings() has the following properties:
| Property | Type | Description |
|---|---|---|
useSystemSettings |
boolean |
If true (default), will use the OS proxy settings. |
url |
string |
Proxy URL to use. |
pacScript |
string |
URL to a proxy auto-configuration script (PAC). |
autodetectTimeoutMs |
number |
Interval in milliseconds to wait for response when attempting to detect a PAC script. |
rules |
string |
Semicolon-delimited list of proxy rules. For syntax, see the Electron Set Proxy Config documentation. |
bypassRules |
string |
Semicolon-delimited list of host patterns that will always use direct connection. For syntax, see the Electron Set Proxy Config documentation. |
useConfig |
boolean |
If true, will discard all programmatically set proxy settings and revert to the proxy settings defined in the system.json file of Glue42 Enterprise. |
OS Info
Available since Glue42 Enterprise 3.13
You can allow apps to access OS information (list of running processes, OS version, Glue42 start time) through their app configuration. The information can then be retrieved through the glue42gd object injected in the global window object when the app is started.
Configuration
To allow an app to access OS information, set the "allowOSInfo" property to true in the "details" top-level key:
{
    "details": {
        "allowOSInfo": true
    }
}
Runtime Access
To retrieve the necessary OS information, use the glue42gd object injected in the global window object:
// Returns a list of all running processes.
const processes = await glue42gd.os.getProscesses();

// Extracting the PID, name and start time of the first process from the list.
const { pid, name, startTime } = processes[0];

// Returns the OS version as a string.
const version = glue42gd.os.getVersion();

// Returns the Glue42 start time as a string - e.g., "2021-10-20T06:54:49.411Z".
const startTime = glue42gd.glue42StartTime;
Clearing DNS & HTTP Cache
Available since Glue42 Enterprise 3.17
To allow an app to clear the DNS or HTTP cache, use the "allowClearingCache" top-level key of the app configuration file. Methods for clearing the cache are available on the glue42gd object attached to the global window object.
Allowing an app to clear cache:
{
    "allowClearingCache": true
}
Clearing HTTP and DNS cache:
// Clearing the HTTP cache.
await glue42gd.clearCache();
// Clearing the DNS cache.
await glue42gd.clearHostResolverCache();
Adding DevTools Extensions
You can extend the Chrome DevTools in Glue42 Enterprise with additional extensions. To add a DevTools Extension supported by Electron, you need to have the extension installed and add a configuration for it in the system.json file of Glue42 Enterprise and in the configuration file of your app. The example below demonstrates adding the React DevTools Extension to Glue42 Enterprise:
Install the React DevTools Chrome extension.
Locate the extension on your local machine - the default location for the React DevTools Extension is
%LocalAppData%\Google\Chrome\User Data\Default\Extensions\fmkadmapgofadopljbjfkapdkoienihi. (You can move the extension installation folder wherever you like.)Open the
system.jsonconfiguration file of Glue42 Enterprise located in%LocalAppData%\Tick42\GlueDesktop\configand add the path to the React DevTools Extension under the"devToolsExtensions"top-level array:
{
    "devToolsExtensions": [
        "C:\\Users\\<username>\\AppData\\Local\\Google\\Chrome\\User Data\\Default\\Extensions\\fmkadmapgofadopljbjfkapdkoienihi\\4.23.0_0"
    ]
}
Replace <username> with your local username. The path must point to the version folder of the extension containing the manifest.json file. Remember to escape the backslash characters.
- Open the JSON configuration file of your app and add the following configuration under the
"details"top-level key:
{
    "security": {
        "sandbox": false
    }
}
For instance:
{
    "name": "My App",
    "details": {
        "url": "http://localhost:3000",
        "security": {
            "sandbox": false
        }
    }
}- Start Glue42 Enterprise, open your Glue42 enabled app and you should be able to see the added extension to the Chrome DevTools when you open the developer console. In this case, you will need a React app in order to be able to see the React DevTools Extension.